When water leaks from tank to bowl, you need to repair or replace the flush valve. Did I perform this simple fix? No, that would be too easy. I took the tank off of the toilet and replaced every damn item inside it. I turned a ten minute job into a three day job, but now I am an expert when it comes to Kohler Wellworth toilets and the Kohler Drylock tank to bowl connection system.
This was my plumbing odyssey.
 |
| #1 Every plumbing project begins with turning off the water supply. Another little piece of advice is to have plenty of old towels on hand. |
 |
| #2 Toilet Tank Guts The fill valve brings the water into the tank filling it to the appropriate level. The flush valve raises when you depress the handle, letting 1.6 gallons of water flow down into the bowl to flush away the pees and poos. There is a $3.00 gasket in the flush valve that I could have replaced, and that probably would have solved my problem. Instead, I opted to rip it all out. All the parts cost $60.00 at US Supply: https://virtualcounter.ussupply.com/ I had to go to a plumbing supply house because Home Depot and Lowe's don't carry a full line of Kohler parts. |
 |
| #3 Disconnect the tube which runs from the fill valve to the flush valve. |
 |
| #4 Remove the flush lever. |
 |
| #5 Twist out the flush valve by turning a quarter turn to the left and lifting it out. The black base stays for now. |
 |
| #6 This picture shows the deteriorated condition of the gasket. |
 |
| #7 You have to remove a set of nuts and washers under the tank on either side of the toilet. Now you can lift off the tank. |
 |
| #8 I had to get the tank mounting parts off the bottom of the tank. I went out and bought an adjustable wrench that I am sure I will never use again - another $16.00. The wrench was useless. The inside (Picture #5) and outside parts were fused together. Everything spun round and round. I couldn't think of a way to hold the inside part still while I cracked loose the outside part. That's where a plumber's helper/second set of hands would have been nice. |
 |
| #9 I solved the problem by employing my trusty hack saw. I sawed off the outside plastic ring. My pile of new parts contained a new ring, so there was no need to save the original. |
 |
| #10 Let's talk about that Drylock tank to bowl connection I mentioned earlier. The water flows to the bowl through a hole in the center of the tank bottom. Go back up to picture #5 and look at the black flush valve base that stayed inside the tank. The threaded base goes through the hole and out the bottom of the tank. A black metal plate gets slapped on. Then a big black plastic ring gets screwed on to hold it all together. The bottom of the tank has indentations that allow you to slide the tank mounting bolts into slots in the black metal plate. There are a couple of gaskets that prevent leaking. The tank gets popped back onto the toilet base and screwed down. I was worried that I might screw it down too tightly and crack the porcelain. I made it as tight as I dared, but it seems that the tank has a teensy wobble when I push on it. So, don't push on it, right? There are no leaks, so I decided it's all good. |
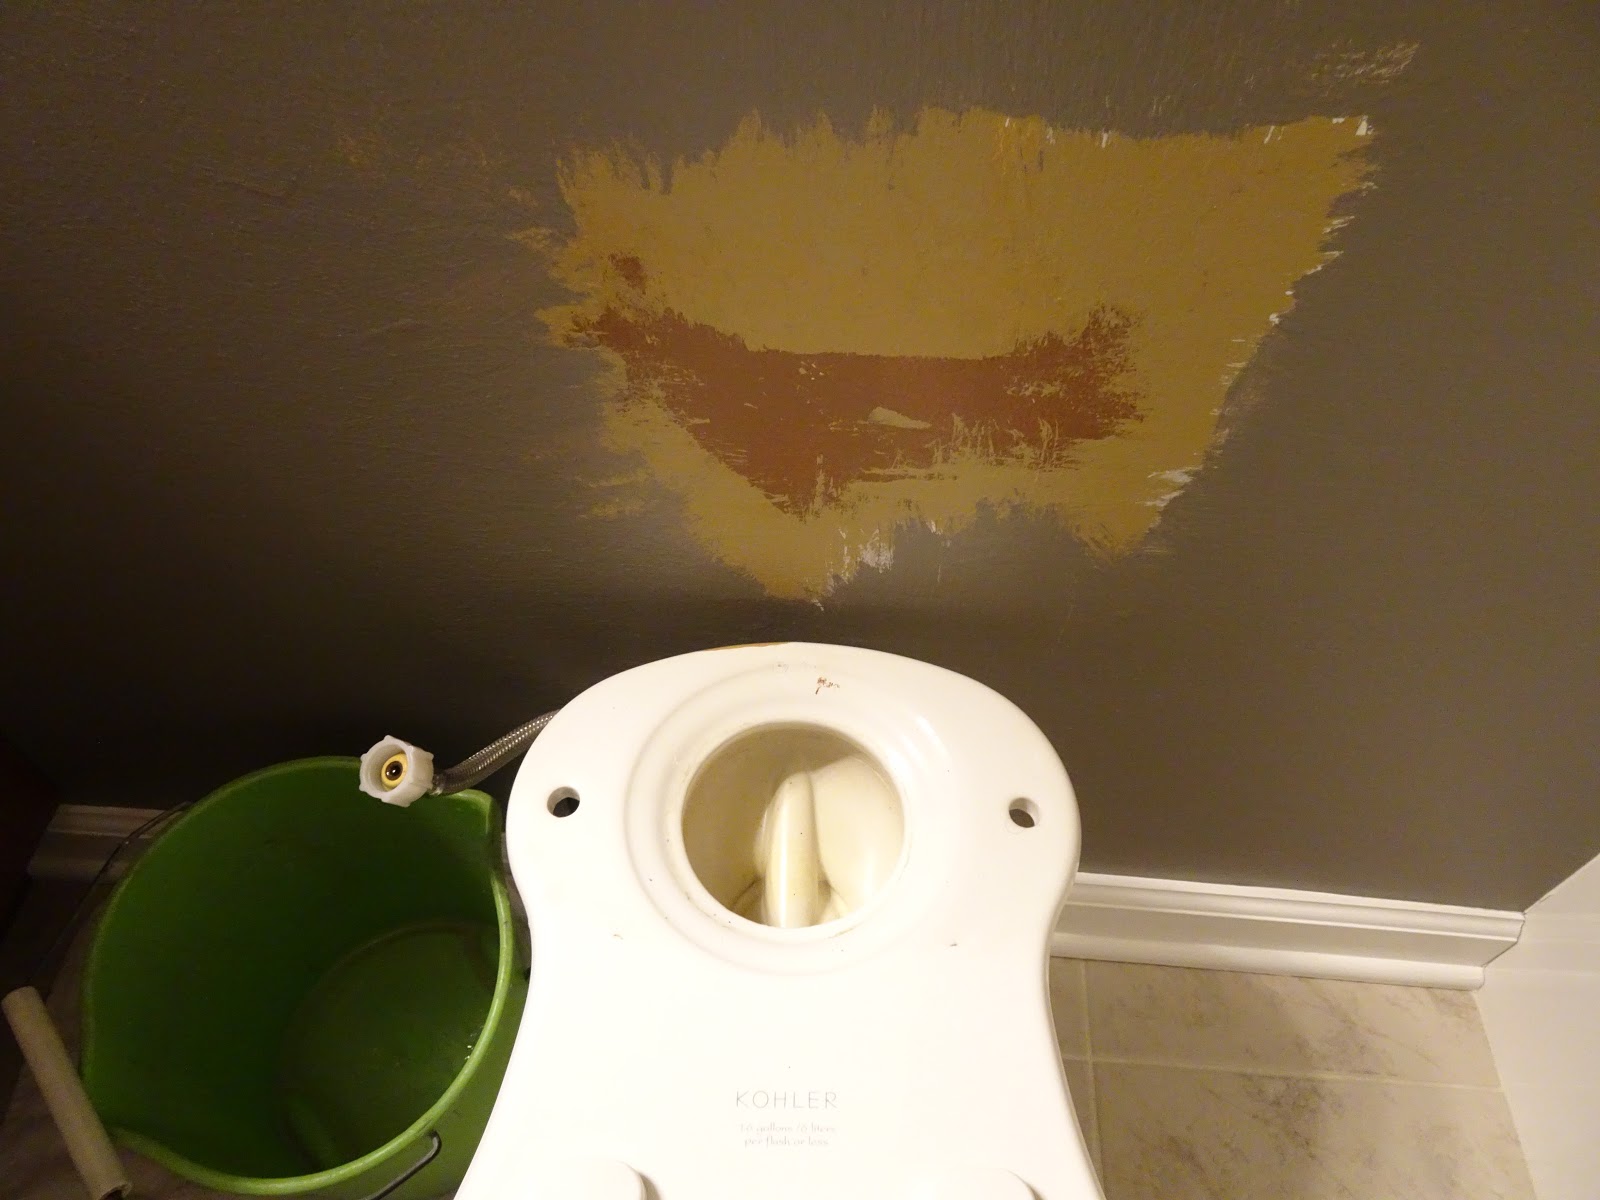 |
| #11 Oh, my. You can see all the colors the walls have been painted. With each new paint color I was less concerned with getting behind the toilet. Did I take this opportunity to apply some paint to the wall? Nah. Nobody sees back there. There is a big, spongy gray gasket that goes into the hole in the base before setting the tank back on. |
 |
| #12 When everything is back together, you turn the water on. When I did this, the eleven year old supply line leaked. These lines should be replaced every ten years, so it was off to the Home Depot for a new line. |
 |
| #13 I paid a couple of bucks extra to get a Fluid Master line that makes a clicking sound when it is just tight enough. Amateurs like me need all the help we can get. |
 |
| #14 So pretty, new, and clean inside. By the way, do you see the writing on the inside wall of the tank? You need those numbers when you go to the plumbing supply store to buy parts. |
 |
| #15 The last in this series of traumatic events was the shockingly low water level after that first test flush. I added some food coloring so the water level would be obvious in the photo. I did my repairs on Saturday and Sunday, so I had to wait until Monday to call the Kohler help line. I was assured that the water level should be 6.5 inches below the rim of the bowl. The water level in my toilet was 6 inches below the rim, so I actually had a little extra water in the bowl. How do you measure the distance from the rim to the surface of the water? I set a yard stick across the rim of the bowl, then lowered a ruler into the bowl until it touched the water. The crossing point where the ruler met the yard stick showed me the distance to the water's surface. |
No comments:
Post a Comment